正在更新中……
秋招在即,用这篇博客记录一下算法岗求职过程中的一些必备知识汇总。
视觉Backbone
CNN
CNN的感受野
定义是卷积神经网络每一层输出的特征图(feature map)上的像素点在输入图片上映射的区域大小
CNN的参数量计算
,最后一项是偏置项。
1x1卷积的作用,与Linear的区别
- 1x1卷积相当于是在通道维度上做Linear,它不改变特征图的空间信息,同时能够将跨通道的信息进行整合,对通道维度进行升维降维。
- Linear操作的是一维向量,没有空间信息。
将[B,C,H,W] reshape成[B,H*W,C]后过Linear,与直接在[B,C,H,W]上做1x1卷积效果相同。
Numpy手搓卷积
1
2
3
4
5
6
7
8
9
10
11
12
13
14
15
16
17
18
19
20
21
22
23
24
25
26
27
28
29
30
31
32
33
def filter2d(image, kernel):
# 获取输入图像和卷积核的维度
image_height, image_width = image.shape
kernel_height, kernel_width = kernel.shape
# 计算滤波结果的维度
output_height = image_height - kernel_height + 1
output_width = image_width - kernel_width + 1
# 初始化滤波结果数组
filtered_image = np.zeros((output_height, output_width))
# 进行滤波操作(实际上是二维卷积操作)
for i in range(output_height):
for j in range(output_width):
# 提取当前窗口的像素值
window = image[i:i+kernel_height, j:j+kernel_width]
# 计算当前位置的卷积和
filtered_image[i, j] = np.sum(window * kernel)
return filtered_image
# 定义一个图像和卷积核(滤波器)
image = np.array([[1, 2, 3],
[4, 5, 6],
[7, 8, 9]])
kernel = np.array([[1, 0],
[0, -1]])
# 应用滤波器
filtered_image = filter2d(image, kernel)
print(filtered_image)
ViT
- ViT的结构描述
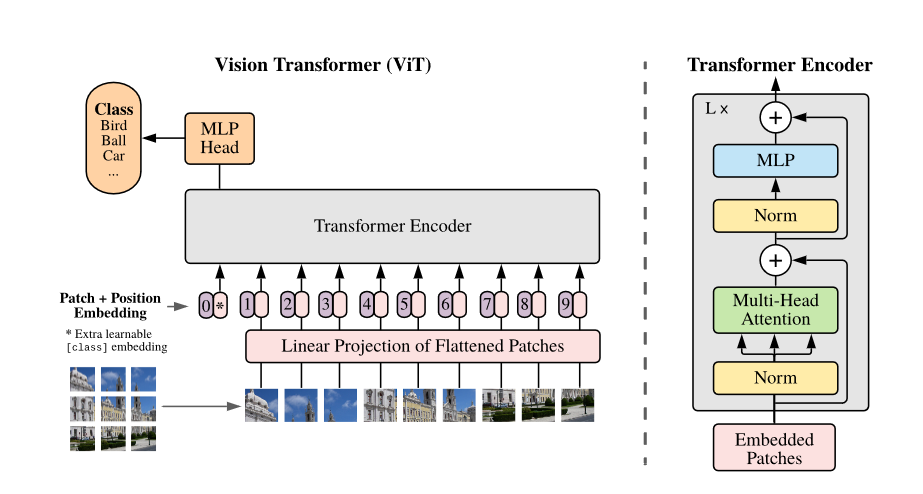
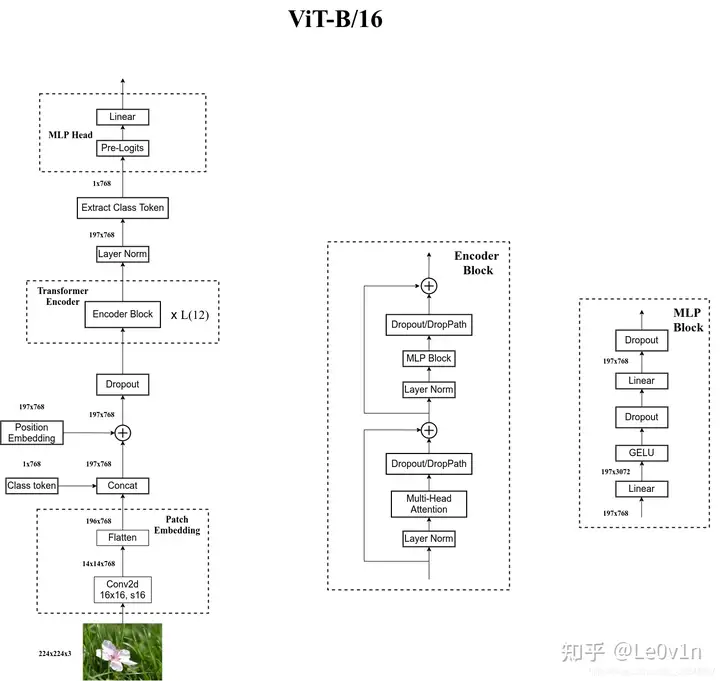
- 将图片patchify成P*P的patch,共N个patch。将每个patch进行flatten之后过一层线性层之后得到embedding。
- 与BERT类似,在patched embedding序列开头附加一个可学习的[class] token,来表示整个图片representation。
- 使用的位置编码为learnable 1D position embedding。
- 整体的结构为Transformer Encoder。
- 最后将[class] token的embedding过分类头。
- 微调时通常会使用更高分辨率,此时保持patch size不变,这样sequence length会变大,position embedding会不够用。文中采取的做法是进行2D插值拟合得到position embedding。
- 手撕ViT的patchify
1
2
3
4
5
6
7
8
9
10
11
12
13
14
15
16
17
18
19
20
21
22
23
24
25
26
class PatchEmbed(nn.Module):
"""
2D Image to Patch Embedding
"""
def __init__(self, img_size=224, patch_size=16, in_c=3, embed_dim=768, norm_layer=None):
super().__init__()
img_size = (img_size, img_size)
patch_size = (patch_size, patch_size)
self.img_size = img_size
self.patch_size = patch_size
self.grid_size = (img_size[0] // patch_size[0], img_size[1] // patch_size[1])
self.num_patches = self.grid_size[0] * self.grid_size[1]
self.proj = nn.Conv2d(in_c, embed_dim, kernel_size=patch_size, stride=patch_size)
self.norm = norm_layer(embed_dim) if norm_layer else nn.Identity()
def forward(self, x):
B, C, H, W = x.shape
assert H == self.img_size[0] and W == self.img_size[1], \
f"Input image size ({H}*{W}) doesn't match model ({self.img_size[0]}*{self.img_size[1]})."
# flatten: [B, C, H, W] -> [B, C, HW]
# transpose: [B, C, HW] -> [B, HW, C]
x = self.proj(x).flatten(2).transpose(1, 2)
x = self.norm(x)
return x
目标检测
IOU计算及手写
1
2
3
4
5
6
7
8
9
10
11
12
13
14
15
16
17
18
19
20
21
22
23
24
25
26
27
28
29
30
31
32
33
34
def bbox_iou(box1, box2):
"""
Calculate the Intersection over Union (IoU) of two bounding boxes.
:param box1: (x1, y1, x2, y2) - coordinates of the first bounding box
:param box2: (x1, y1, x2, y2) - coordinates of the second bounding box
:return: IoU of the two bounding boxes
"""
# Determine the coordinates of the intersection rectangle
x1_inter = max(box1[0], box2[0])
y1_inter = max(box1[1], box2[1])
x2_inter = min(box1[2], box2[2])
y2_inter = min(box1[3], box2[3])
# Compute the area of intersection
width_inter = max(0, x2_inter - x1_inter)
height_inter = max(0, y2_inter - y1_inter)
area_inter = width_inter * height_inter
# Compute the area of both bounding boxes
area_box1 = (box1[2] - box1[0]) * (box1[3] - box1[1])
area_box2 = (box2[2] - box2[0]) * (box2[3] - box2[1])
# Compute the intersection over union by taking the intersection
# area and dividing it by the sum of both areas minus the intersection area
iou = area_inter / float(area_box1 + area_box2 - area_inter)
return iou
# Example usage:
box1 = (1, 1, 4, 4)
box2 = (2, 2, 5, 5)
iou = bbox_iou(box1, box2)
print(f"IoU: {iou}")NMS描述及手写
1 | def nms(boxes, scores, iou_threshold): |
Focal Loss
Focal loss解决的问题
类别样本不均衡或Hard examples学习不好。
普通CE对Well-classified的sample的loss依旧很大,并且通常这些sample很多(background),这导致模型对hard example的梯度反传较小。Focal loss公式
通常,取2时效果好;在正样本中取0.25,负样本中取0.75。
手撕Focal loss
1
2
3
4
5
6
7
8
9
10
11
12
13
14
15
16
17
18
19
20
21
22
23
24
25
26
27
28
29
30
31
32
33
34
35
import torch
import torch.nn as nn
import torch.nn.functional as F
from torch.autograd import Variable
class FocalLoss(nn.Module):
def __init__(self, gamma=0, alpha=None, size_average=True):
super(FocalLoss, self).__init__()
self.gamma = gamma
self.alpha = alpha
if isinstance(alpha,(float,int,long)): self.alpha = torch.Tensor([alpha,1-alpha])
if isinstance(alpha,list): self.alpha = torch.Tensor(alpha)
self.size_average = size_average
def forward(self, input, target):
if input.dim()>2:
input = input.view(input.size(0),input.size(1),-1) # N,C,H,W => N,C,H*W
input = input.transpose(1,2) # N,C,H*W => N,H*W,C
input = input.contiguous().view(-1,input.size(2)) # N,H*W,C => N*H*W,C
target = target.view(-1,1)
logpt = F.log_softmax(input)
logpt = logpt.gather(1,target)
logpt = logpt.view(-1)
pt = Variable(logpt.data.exp())
if self.alpha is not None:
if self.alpha.type()!=input.data.type():
self.alpha = self.alpha.type_as(input.data)
at = self.alpha.gather(0,target.data.view(-1))
logpt = logpt * Variable(at)
loss = -1 * (1-pt)**self.gamma * logpt
if self.size_average: return loss.mean()
else: return loss.sum()
语义分割
UNet
SAM
自监督预训练
DINO
DINO的特性是什么?
Self-distillation with no label.
- 通过完全自监督的学习方式,ViT学得了图片的语义分割的信息!
- 对提取出的feature仅使用KNN分类器,就能在ImageNet上达到78.3%的top1准确率。
DINO的自监督学习方式
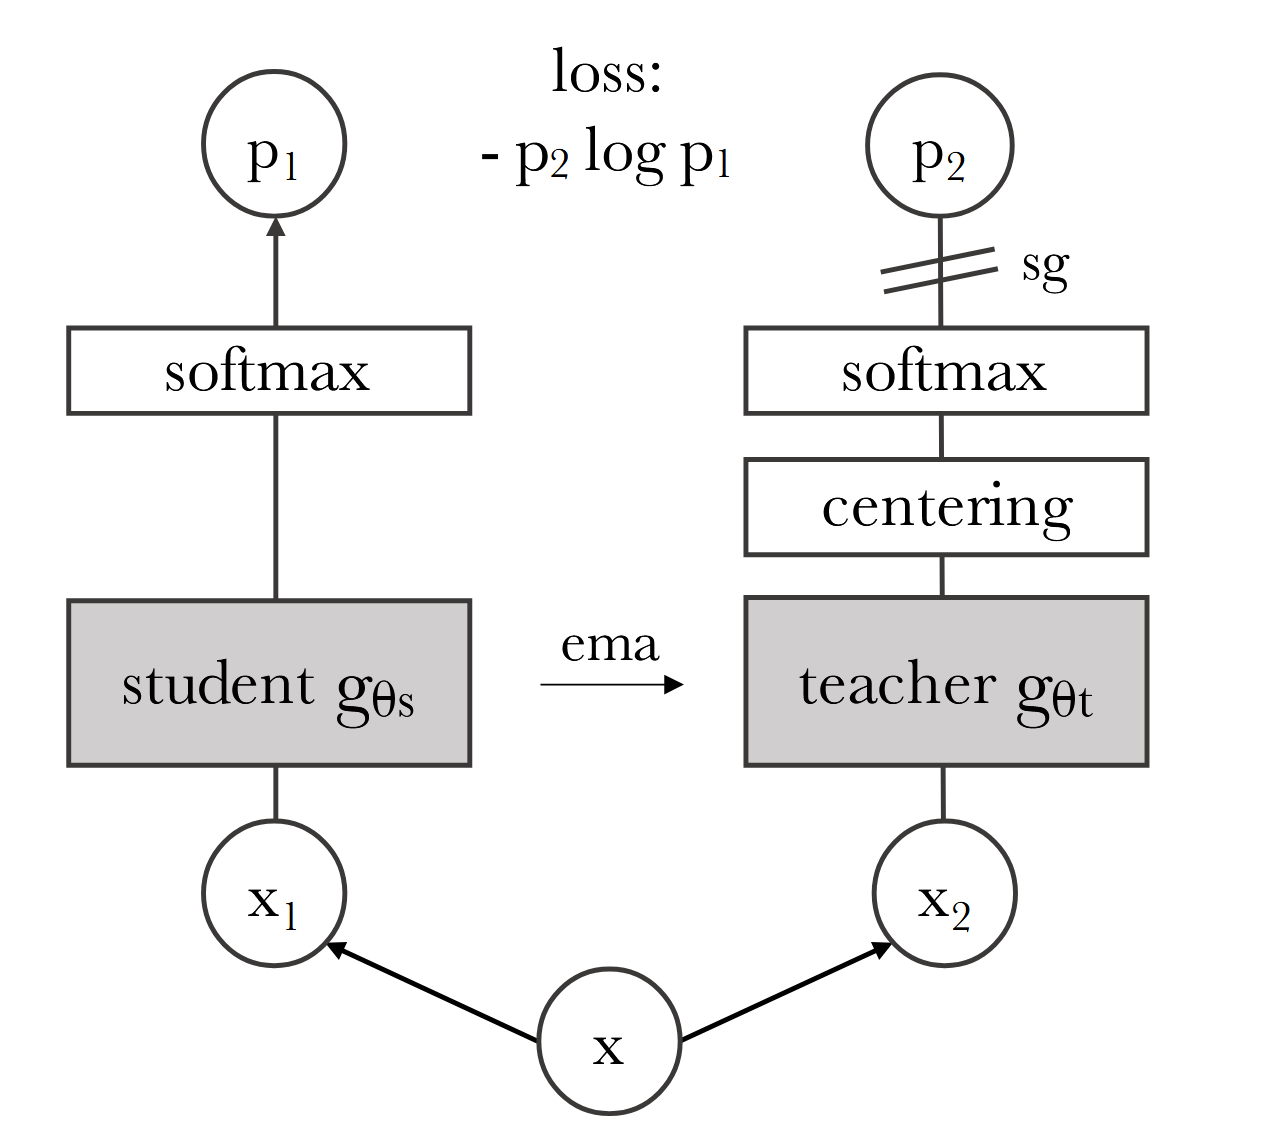
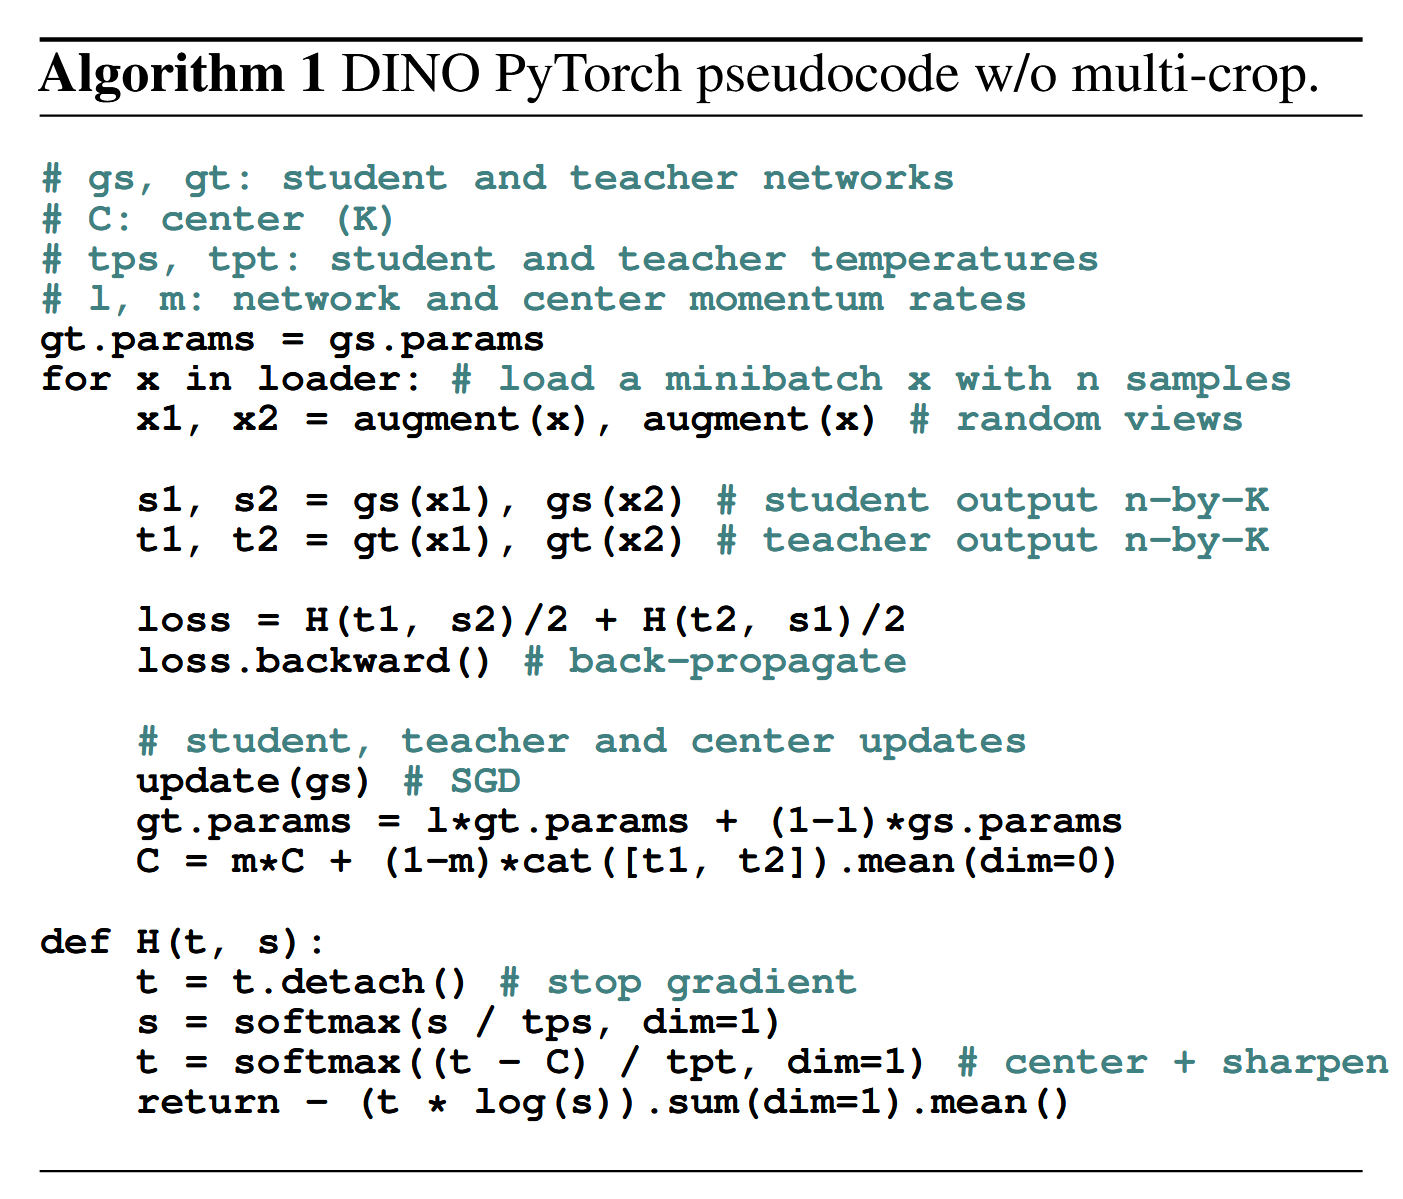
包含teacher和student网络,两部分是完全同样的结构:ViT(patch 8或16)后接一层linear,输出K维的logit,然后经过一个带temperature的softmax。最终的优化目标是两部分分布的交叉熵。
对于teacher和student的输入不同:首先会将一张图片进行两种不同的RandomResizedCrop,得到两个分辨率较大的global view;然后会使用multi-crop得到多个较小分辨率的local views。
然后将local and global views输入给student,global views给teacher,然后分别计算每一对之间的交叉熵损失。这样可以鼓励模型学到local-to-global的对应关系。对于teacher网络的更新,其不使用梯度更新(stop gradient),而是使用EMA(指数移动平均)的方式使用student的权重来更新。
为了避免collape(K维的feature集中在某一维或均匀分布在K维),对teacher网络的输出采取了centering和sharpening的策略。
- 对于centering,会使用teacher输出的EMA维护一个center值,计算softmax值时减去该center。这样可以避免K维feature集中在某一维。
- 对于sharpening,实现方式是在softmax中使用一个较小的temperature,这样可以使得softmax之后的分布更加尖锐。
两种策略同时使用,会互相制衡,最后避免collape。
DINO中softmax的temperature的作用
较小的temperature会将输出数值放大,差异更大,从而输出的softmax分布更加尖锐。
较大的temperature会使得softmax分布更加平滑。
DINO中应用于下游任务中是哪个网络?
学生网络负责从输入的图像中学习特征表示,而教师网络则提供一个稳定的目标,帮助学生网络学习。具体来说,学生网络接收所有预处理过的图像裁剪(包括局部和全局视图),而教师网络仅接收全局视图的裁剪图。学生网络的输出会模仿教师网络的输出,通过这种方式,学生网络可以学习到更好的特征表示.
因此在下游任务中使用的是学生网络。
MAE
MAE的主要特点
- 非对称的Encoder-Decoder结构:Encoder只encode没有被mask掉的tokens,而Decoder需要decode所有token。
- 极大的mask比例(75%):相比于BERT的15%掩码概率,MAE使用了75%的掩码概率。这样的好处是既能增大task的难度,又能极大减少encoder的计算量。
MAE的模型结构与训练pipeline
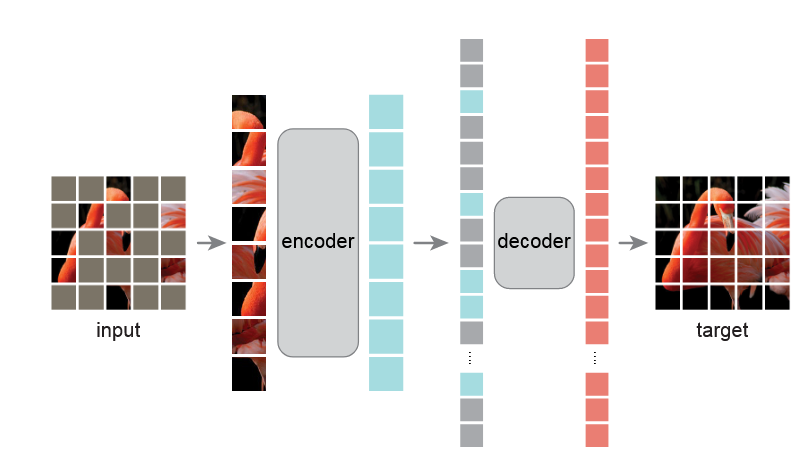
- 首先会将图片切成patch(一般是16 * 16),然后取75%的patch进行mask。
- MAE Encoder:是ViT,但是输入的只有unmasked patches,被mask的patch不输入。
- MAE Decoder:是ViT,输入的是完整的token 列表,包括:编码后的visible patches、masked patches。每一个mask token是一个共享的可学习的向量,同时会添加PE为mask token注入位置信息。(下游任务时,decoder不使用,因此decoder与encoder的结构可以是解耦的)
- Linear:decoder出来的vector会过一个linear将维度转换到P * P * C,对应的是patch内的像素值。
- Loss:使用MSE loss对mask的patch的像素值进行计算。与BERT相同,只对mask掉的部分进行loss计算。同时作者还实验了一种变种,预测一个patch内的normalized pixel value,这样可以涨点。
MAE为什么能很好地学到视觉特征?
- mask比例很高(75%),对于encoder是个非常有挑战性的pretext task。
- 被mask掉的部分通过周边可见的patch来恢复信息,这导致了encoder学得的视觉特征本身就得包含语义信息。
MAE的encoder和decoder为什么是非对称的结构?
- 这是因为上下游任务的gap。在BERT中,预训练的输入中是包含mask的,这与下游微调任务的输入存在gap。因此在MAE中,为了与下游任务的输入对齐,在Encoder的输入中也不引入mask。
- 同时,encoder输入中只输入25%的patch,对模型训练速度大大提升(三倍以上)。


